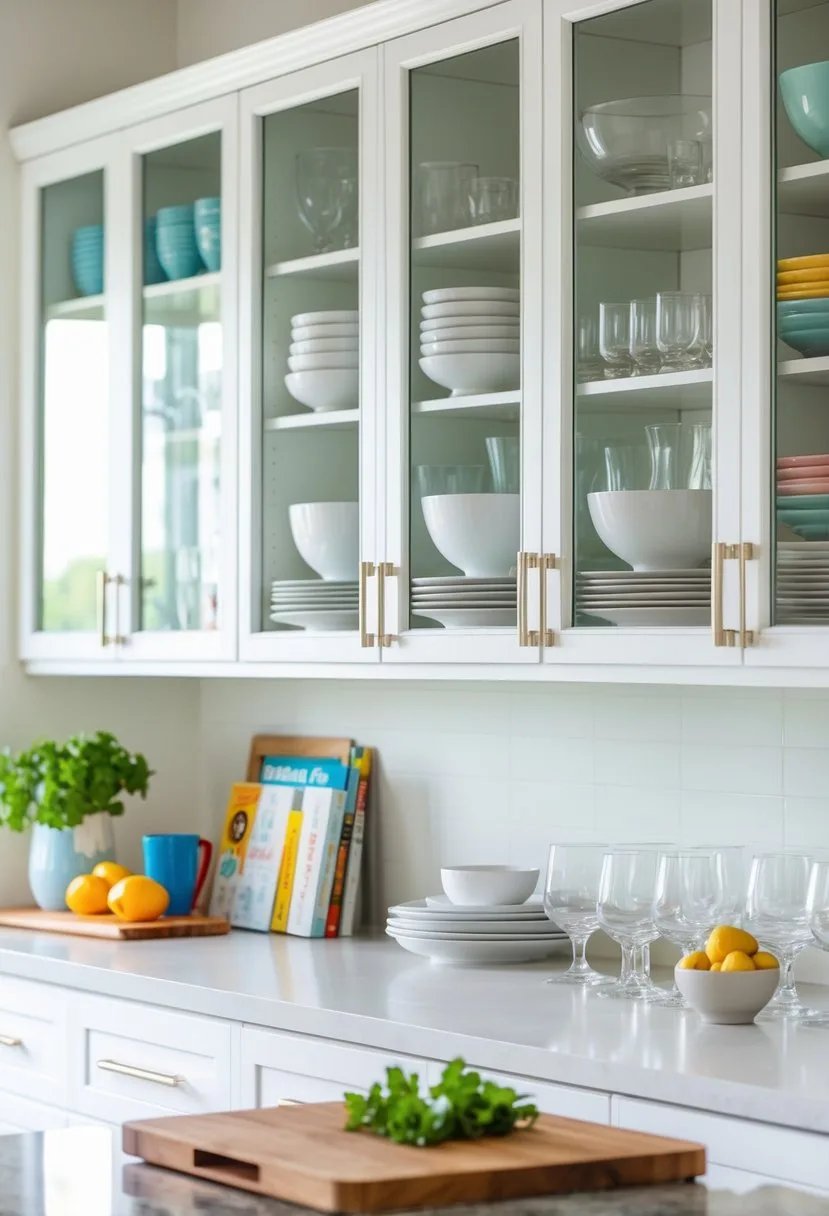
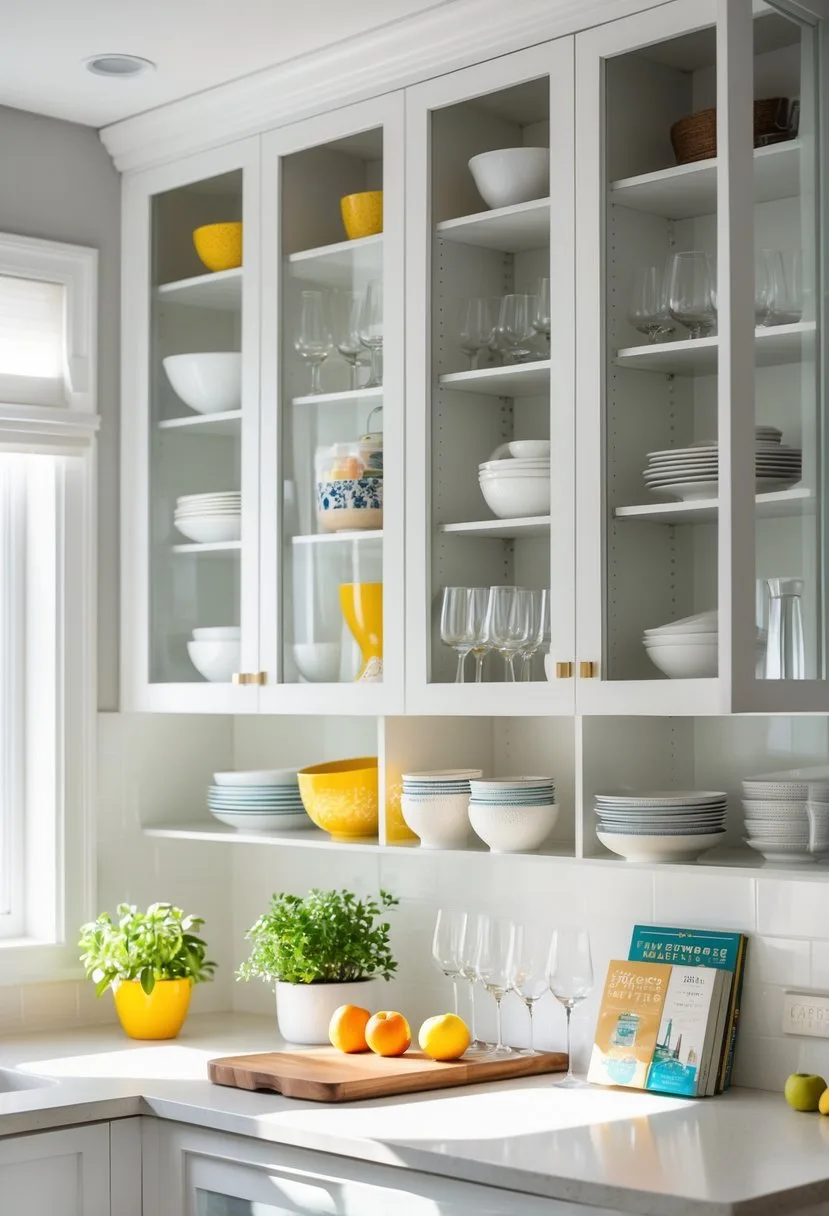
Glass kitchen cabinets let you show off pretty dishes, glassware, and favorite items while keeping them clean. Use a mix of everyday pieces and a few decorative objects so the display feels useful, tidy, and personal.
Put your most attractive, frequently used pieces where they catch the light. Stack bowls, group sets, and throw in a few decorative items to keep things interesting.
Simple shelving rules make styling easier: limit clutter, repeat colors and shapes, and use jars or baskets for small things. If you want a softer look, try frosted or reeded glass, or paint the cabinet back to hide busy contents while still keeping the room bright.
Key Takeaways
- Show a mix of everyday and decorative pieces for function and style.
- Group similar items and repeat shapes or colors to create balance.
- Use glass type and storage containers to hide clutter and make maintenance easier.
What to Display in Glass Kitchen Cabinets
Pick items that look tidy, match your kitchen’s colors, and get used often. Arrange things so they’re easy to grab and nice to look at.
Everyday Dinnerware
Keep your daily plates and bowls where you can reach them quickly. Stack plates by size, largest at the bottom, to save space and keep shelves neat.
Use matching sets or two coordinating colors for a clean, intentional look. Keep frequently used pieces at eye level.
Reserve lower shelves for heavier items like serving bowls. Put lighter or less-used dishes up high.
If you worry about chips, put a thin non-slip liner under stacks to stop sliding.
Glassware and Stemware
Group drinking glasses and stemware by type: tumblers, wine glasses, champagne flutes. Hang stemware from an under-shelf rack to free up space and protect fragile stems.
Store everyday glasses on lower shelves you can reach easily. Put special occasion or delicate glassware higher, or behind frosted glass if you want less visibility.
Keep similar heights together for straight, tidy lines.
Decorative Plates and Dishes
Show off a few decorative plates or patterned dishes as focal points. Stand plates on simple holders or lean them against the back of the cabinet to highlight patterns.
Mix in small objects like a single ceramic pitcher or a flat woven coaster for texture. Limit decorative pieces to one or two per shelf so things don’t get crowded.
Repeat colors or shapes across shelves to tie the display together.
Showcasing Collectibles and Specialty Items
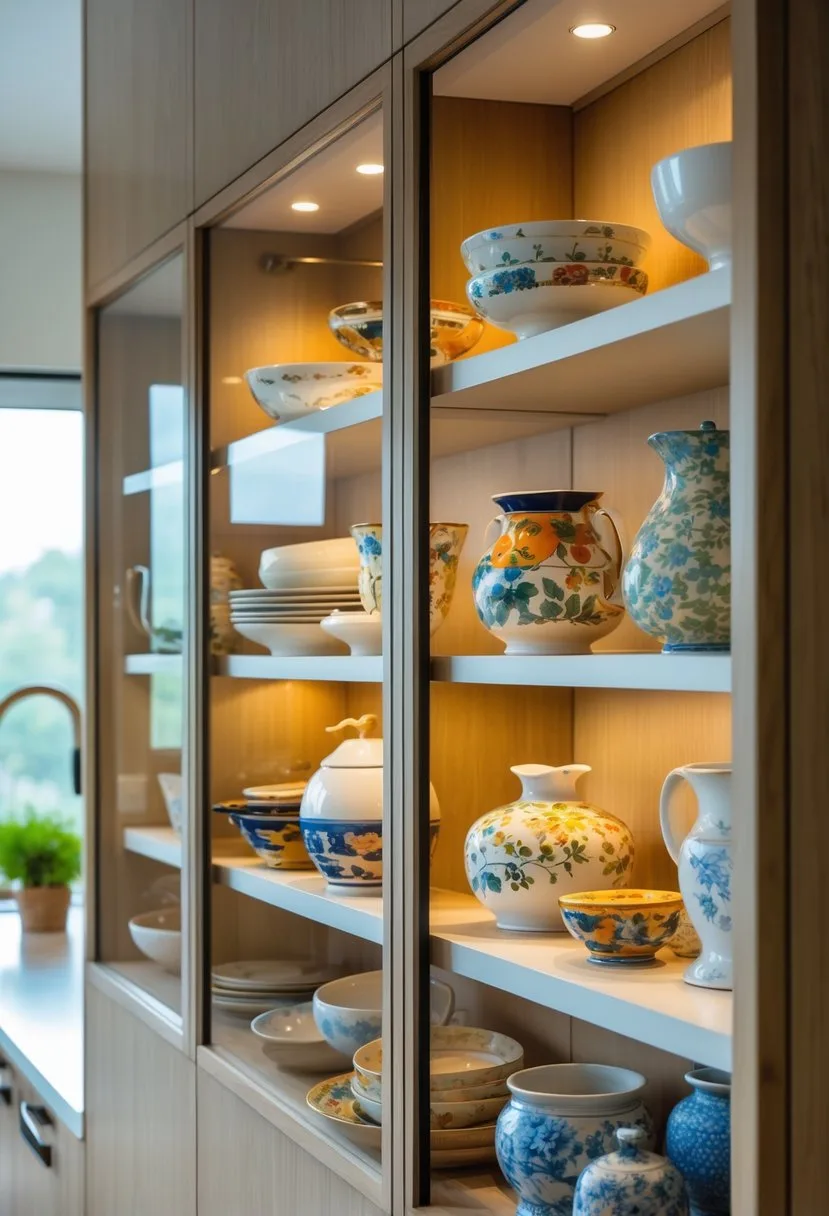
Display only pieces you love and use. Group items by type, color, or era so your cabinets look tidy and intentional.
Fine China Collections
Put your best plates and teacups on eye-level shelves so you and guests can enjoy them. Use plate stands for single showpieces and stack dinner plates in small, even piles.
Keep matching sets together and mix in a few neutral items—plain white or clear glass—to let patterns stand out.
Add soft LED strip lights under each shelf to reduce glare and bring out colors. Use non-slip museum pads under bowls and cups to prevent shifting.
If you worry about dust, store rarely used pieces toward the back and daily-use items near the front.
Vintage Cookware
Show off cast-iron skillets, copper pans, or enamelware where their patina or bright finishes can be seen. Hang a small hook rack inside the cabinet for lids or ladles to save shelf space.
Stack pans by size and use felt or cloth between them to protect finishes. Label shelves with small tags if you collect multiple brands or eras.
Keep heavy items on lower shelves to avoid accidents. Don’t put cast-iron pieces near acidic dishes that could mark or react with their surfaces.
Seasonal and Holiday Pieces
Rotate holiday bowls, themed platters, and seasonal mugs so they stay visible and fresh. Store off-season items behind clear containers or up top; keep current pieces at eye level for quick grabs.
Use clear risers to create layers without overcrowding. Group by season—spring florals, autumn harvest, winter holidays—and stick to a few focal items plus supporting pieces.
Styling Tips for Arranging Items

Go for clear groupings, even spacing, and a mix of function and looks. Use color, balance, and layered heights to keep things tidy and useful.
Color Coordination
Pick a simple palette of two or three colors that match your kitchen. Use one main color (plates or bowls), one accent (mugs or decor), and one neutral (white, clear glass, or wood) to tie it together.
Arrange by color: put the main color on the middle shelf for visibility. Place accents on either side for small visual “anchors.”
Keep neutrals near task areas so the cabinet still feels functional. Repeat colors in groups of three or five to guide the eye.
If you’ve got patterned pieces, limit them to a single shelf so patterns don’t compete.
Symmetry and Balance
Aim for balance, not perfect symmetry. Pair similar items across the cabinet—two stacks of plates, matching jars at each end, or equal-height glassware on both sides.
Mix large and small items for visual balance. If one side has a tall vase, stack some bowls on the other to match its weight.
Leave small gaps between groups (about one to two inches) so things don’t look crowded. Center a focal piece on a middle shelf and echo its color or shape on the top or bottom shelf.
Layering and Depth
Layer items front to back for depth. Put a row of plates or tall glassware at the back, smaller bowls or cups in front.
This way, you keep daily items handy and show off decorative pieces. Vary heights within each group—stack plates, add a cake stand, or place a short jar next to tall glasses.
Use risers or small stands to lift items in the back. Mix up textures—matte ceramics, clear glass, woven baskets—to avoid a flat look.
Leave some negative space so each layer stands out. Don’t fill every inch, and swap items seasonally to keep things feeling fresh.
Maximizing Functionality and Aesthetics
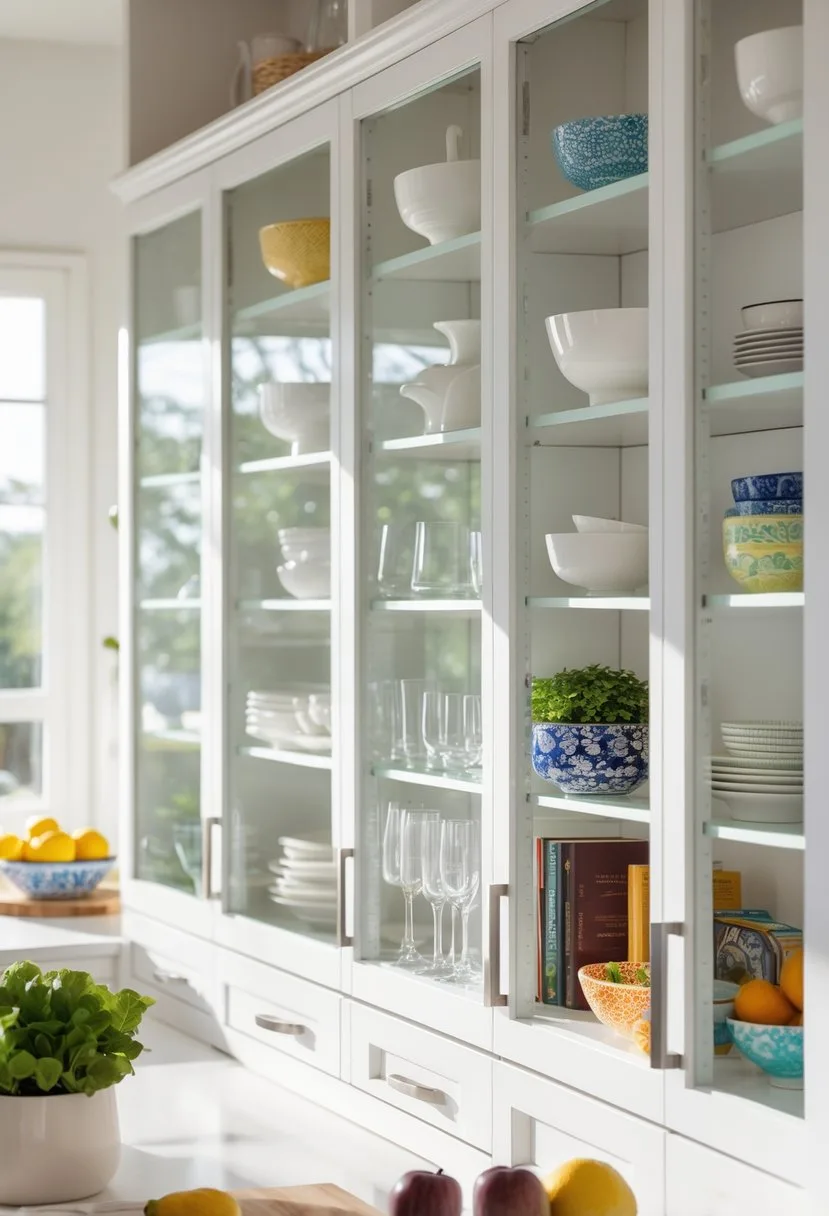
Use glass doors to show useful items and create visual order. Put daily-use pieces within reach, add lighting to highlight groupings, and mix in closed storage for clutter.
Organizing by Frequency of Use
Put the stuff you grab every day at eye level or lower so you don’t have to stretch. Keep plates, bowls, and everyday glasses in one accessible cabinet.
Reserve higher shelves for seasonal or rarely used serving pieces. Group similar items together—drinking glasses on one shelf, coffee mugs on another—to make cleanup and prep faster.
Use shelf risers or small plate stands for short stacks. Try labeled baskets or clear bins on lower shelves for small things like tea bags, napkins, or lids.
Store fragile or expensive glassware behind a single glass door, away from high-traffic work zones. Leave at least one cabinet with closed doors or pull-out drawers nearby to hide clutter.
Lighting for Enhanced Display
Add LED strip lights along the cabinet ceiling or inside the back to make contents easy to see. Go for warm white (2700–3000K) to flatter ceramics and wood, or cool white for crystal and stainless.
Install lights on a switch or motion sensor so they come on only when needed. Use dimmable fixtures to adjust brightness for day or night.
Uplighting softens shadows, while downlighting highlights the front edge of plates and bowls. Avoid harsh bulbs that glare on the glass.
Test placement with your display items to get even illumination and true colors.
Blending Open and Closed Storage
Mix glass-front cabinets with full doors or drawers for balance. Use glass cabinets for attractive, organized collections and closed units for small appliances, Tupperware, and cleaning supplies.
Keep one shelf in each glass cabinet for functional items—cookie sheets, cutting boards, or mixing bowls—to keep things practical. Use solid-front base cabinets near prep zones for heavy or messy stuff.
Match cabinet frames and hardware so the mix looks intentional. If you display colorful dishes, pick closed storage in a neutral finish to avoid clashing.
Popular Decorative Accessories for Glass Cabinets
Pick items that add color, texture, and purpose. Go for pieces that are easy to clean, fit your cabinet depth, and look good from a few feet away.
Vases and Decorative Jars
Vases give height and shape to a shelf. Use two or three vases of different heights—one tall, one medium, one short—for a simple group that stands out behind plates or glasses.
Clear glass vases look light and airy; colored or opaque ceramics hide clutter and add a pop of color.
Decorative jars work for both display and storage. Pick jars with lids for tea, coffee, or dried pasta and label them neatly.
Leave negative space so each piece stands out. Skip tiny items that look busy through glass; bigger shapes read better from across the room.
Cookbooks and Culinary Accents
Cookbooks add warmth and personality when arranged thoughtfully. Stand books upright with decorative bookends or stack a couple horizontally to make a riser for a bowl or oil cruet.
Choose covers that echo your kitchen palette. Culinary accents—like a mortar and pestle, a polished cutting board, or a decorative oil bottle—add texture and function.
Keep these items clean and grease-free. Mix one functional piece with one decorative item per shelf for balance.
Mistakes to Avoid in Glass Kitchen Cabinet Design
Keep displays tidy and consistent. Focus on balance, visibility, and items you actually use or want to show off.
Overcrowding Cabinets
Don’t cram dishes, jars, or boxes into glass cabinets. Overcrowding hides attractive pieces and makes the space look messy.
Leave breathing room: arrange things with gaps between stacks and avoid more than three to five items per shelf group.
Use vertical space intentionally. Put taller items at the back or on one side, shorter items in front to keep sightlines clear.
Hide practical but unattractive stuff. Store plastic containers, mismatched cookware, and bulk pantry goods in opaque cabinets or drawers.
If you need to keep functional items behind glass, use matching baskets or uniform jars to keep the look cohesive.
Clashing Colors or Styles
Don’t mix too many colors, patterns, or eras of dishware. Too many competing hues make the cabinet feel chaotic.
Pick a simple palette—two or three colors that repeat across shelves—to keep things harmonious. Match finishes and materials.
If you show ceramic plates, glassware, and wooden bowls, keep the tones similar (warm vs cool) or use one neutral color as an anchor.
Group similar items together so each material reads as a block, not a jumble. Add one or two standout pieces—an artful pitcher or a colored bowl—rather than scattering lots of accents.
Maintenance and Care for Displayed Items
Keep dust low, prevent chips, and protect finishes so your displayed pieces stay attractive and safe. Use the right cleaners, store fragile items smartly, and check shelves regularly to avoid surprises.
Routine Cleaning
Dust shelves and items about once a week. I usually grab a soft microfiber cloth—seems to prevent that annoying buildup.
For glass doors, spray a streak-free glass cleaner onto the cloth, not straight onto the glass. This way, you won’t get drips sneaking down onto wood or metal.
Wipe ceramics and glazed dishes gently with a damp cloth. If you’re cleaning metal pieces, dry them right away so you don’t end up with spots or tarnish.
Take everything off the shelves before you start cleaning. That’s really the only way to get into the corners and along those tricky shelf edges.
Every few months, empty the cabinet completely and check for stains, sticky bits, or any signs of pests. Clean shelf mats or liners separately—if they’re curling or look gross, just replace them.
Protecting Fragile Pieces
Put fragile stuff on lower shelves to lower the risk of falls. I like using museum putty or little non-slip pads under vases, bowls, or small sculptures—they actually help keep things in place when the doors move.
Group fragile pieces with sturdier ones in between to act as buffers. Don’t stack delicate glass unless you’ve got soft liners between each piece.
If you’ve got heirlooms or super thin glass, maybe just display one per shelf and leave some open space around it. It feels safer that way.
Watch the humidity and temperature in the kitchen. Try to keep cabinets away from stove and dishwasher vents.
If you’re displaying silver or brass, polish it now and then with a product meant for that metal. I keep a polishing cloth nearby just in case.
Frequently Asked Questions
Here’s a quick dive into ways you can arrange, style, and pick items for your glass-front kitchen cabinets. I’ve gathered some ideas for display, minimalist choices, layout tips, pros and cons, and matching hardware.
How can one creatively display items in glass-front kitchen cabinets?
Group similar items together for a bit of visual punch. Stacking white plates on one shelf, matching glassware on another, and sticking to a single color palette for bowls and mugs works surprisingly well.
Add some layers and height—risers or small cake stands do the trick. Put taller stuff in the back, shorter pieces in front so you can see everything.
Use jars, baskets, or trays to corral small things like utensils, tea tins, or spice jars. Clear or woven containers keep clutter under control and add a little texture.
What are some tasteful decorative ideas for upper kitchen cabinets with glass doors?
Mix practical dishes with decorative pieces. Maybe a couple cookbooks or a small plant next to a set of pretty plates.
Don’t crowd the shelves—two or three decorative objects per shelf is plenty. Try to pick things that fit your kitchen’s color palette, like copper mugs or blue ceramic bowls.
Think about adding backlighting or LED strips to highlight your display. Soft lighting can make glass sparkle and adds a cozy vibe.
What contents are most suitable for modern glass kitchen cabinets in a minimalist design?
Stick with items that have clean lines and neutral colors—white dishes, clear glassware, matte-finish serving pieces. Keeping it to one or two tones gives a calm, uncluttered look.
Use uniform containers for pantry staples like flour, sugar, or pasta. Clear, labeled jars just look tidy and consistent.
Don’t overload the shelves. Minimalism really shines when there’s some breathing room.
How should one arrange items in a kitchen glass cabinet for both aesthetics and functionality?
Keep your go-to items at eye level or somewhere easy to grab. Seasonal or rarely used pieces can go up higher.
Balance the look across shelves by mixing vertical and horizontal elements. Maybe stack some plates next to a row of cups or a short vase.
Keep sets together and label storage jars if you can. Makes it faster to find things and keeps the cabinet looking organized.
What are the benefits and drawbacks of opting for glass doors on kitchen cabinets?
You get to see what’s inside at a glance and show off your favorite dishes or glassware. Glass doors also make the kitchen feel a bit lighter and more open.
Downsides? They need more cleaning, and you’ll probably feel some pressure to keep things neat. Glass shows off mismatched or worn pieces more than solid doors ever would.
You do lose some privacy for the sake of style. If you’d rather hide clutter, maybe try frosted glass or use interior organizers.
Which types of hardware complement glass kitchen cabinets for a cohesive look?
Go for simple, slim pulls or knobs. Match the finish to other kitchen metals—think brushed nickel, matte black, or brass.
If you keep the finishes consistent across handles, faucets, and light fixtures, everything feels more connected. That little detail really ties a space together.
Glass or clear acrylic knobs? They’re a great option too. They echo the cabinet doors and stay subtle.
Stick with small, unobtrusive hinges. Concealed hardware keeps the lines clean and modern, without drawing extra attention.

Jen Moser is a skilled kitchen and bath designer at Wisconsin Building Supply in Appleton, WI, and the author behind the expert remodeling and design content on Vivyro.com. With years of hands-on experience in residential cabinetry, layout planning, and functional aesthetics, she shares practical tips, innovative ideas, and inspiring transformations to help homeowners create beautiful, efficient kitchens and bathrooms that suit their lifestyle and budget.
As the creative voice of Vivyro.com, Jen draws from her professional expertise to offer step-by-step guidance, trend insights, and real-world solutions for remodeling projects. Her approachable, detail-oriented style empowers DIY enthusiasts and homeowners alike to achieve professional-quality results in their own spaces.